Mold Polishing and Texture – Injection Molding Finish
Plastic injection molding allows for the application of a variety of finishes, which are characterized by their gloss or texture, to molded parts. By applying the appropriate surface finish toward the conclusion of the mold-making process, the finish is transferred from the mold to the surface of the molded parts during the plastic injection molding process.
Other manufacturing techniques, including CNC machining and 3D printing, usually need additional operations to finish parts. This method is more costly and time-consuming, particularly when dealing with larger part quantities. Additionally, there are fewer alternatives for texturizing and mold polishing than there are for plastic injection molding.
Next, we will introduce mold polishing and mold texture for plastic injection molding.

Mold Polishing and Mold Texture Standards
Various trade associations and companies establish guidelines and classifications for surface finishes and textures in injection molding. Among these organizations, the Society of the Plastics Industry (SPI) and the Society of German Engineers / Verein Deutscher Ingenieure (VDI) are notable trade associations. Additionally, companies such as Mold-Tech (MT) and Yick Sang (YS) have devised their own standards. This is why terms like “SPI finishes” and “Mold Tech textures” are commonly referenced in discussions related to design for manufacturing (DFM). To follow certain mold polishing and texture standards, it is important to ensure the product quality.
Options for Injection Molded Surface Finishes
Within the framework of each surface finish standard, there exists a multitude of choices for mold polishing and texture. To distinguish and specify these finishes, each designation comprises the relevant organizational acronym followed by letters or numbers. For instance, SPI-A2 corresponds to the Society of the Plastics Industry (SPI) and signifies a high gloss or transparent finish. Meanwhile, MT-11010 represents Mold-Tech’s specification for a light mold texture.
Surface Finishes for Plastic Parts
Despite the existence of various surface finishing standards, they all encompass mold polishing and textured finishes, which are further categorized based on either their appearance or application method.
Polished Finishes:
High Gloss or Transparent
Semi-Glossy
Matte
Textured Finishes:
Bead Blasting
Chemical Etching
Mirror EDM
Continue reading to explore some common types of mold polishes and mold textures, along with design tips that will assist you in achieving optimal results when mold polishing and finishing your parts. For a more in-depth understanding of injection molding, our Injection Molding Design Guide offers additional information and valuable insights.
Polished Finishes
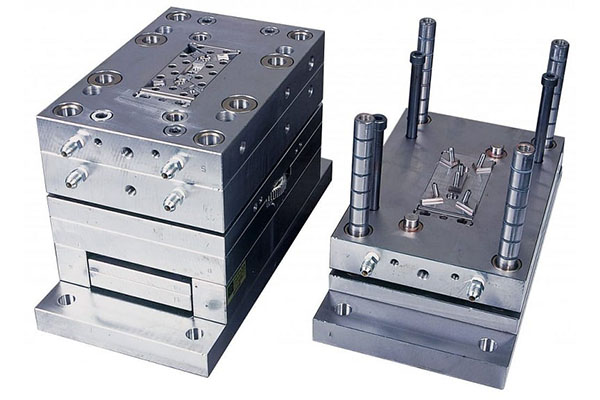
In the realm of injection molding, molds are meticulously crafted using CNC or EDM machinery. Upon the completion of machining, the mold’s core and cavity may exhibit milling or EDM marks. To rectify these surface imperfections, both halves of the mold undergo a meticulous sanding and mold polishing process. Various techniques are employed, yet the industry standard for mold polishing adheres to SPI guidelines. These nine standardized levels of mold polishing finishes are typically executed by highly skilled technicians, employing manual craftsmanship.
High Glossy or Transparent Finishes
SPI standards A-1, A-2, and A-3 represent the pinnacle of mold polishing. These standards yield either a high gloss or transparent finish on plastic components. For opaque plastic grades, these finishes result in a glossy appearance, while for clear plastic grades, they achieve a transparent effect. All three SPI A-levels necessitate rigorous mold polishing involving rotary tools and the application of diamond buffing paste.
To achieve SPI levels A-1, A-2, or A-3, we generally recommend the use of a hardened steel mold. Specifically, stainless steel is employed for A-1, while NAK80 steel is chosen for A-2 or A-3. Hardened steel exhibits superior resilience against potential ripples, sags, and crests induced by rotary tools, delivering a more refined polish compared to molds constructed from aluminum or softer steel materials.
The following discussion delineates SPI A-level standards, their associated finishing techniques, and the measurements of surface roughness. It’s important to note that higher levels of surface finishing and the use of hardened steels influence mold pricing and lead times.
SPI Standard A-1:
High Glossy /Optically Transparent
Finishing Method– Grade #3,6000 Grit Diamond Buff
Surface Roughness– 0.012 to 0.025 Ra (μm)
SPI Standard A-2:
High Glossy /Transparent
Finishing Method– Grade #6.3000 Grit Diamond Buff
Surface Roughness– 0.025 to 0.05 Ra (μm)
SPI Standard A-3:
High Glossy /Transparent
Finishing Method– Grade #15.1200 Grit Diamond Buff
Surface Roughness– 0.05 to 0.10 Ra (μm)
Semi-Glossy Finishes
Within the realm of mold polishing, SPI finishes B-1, B-2, and B-3 constitute the intermediate levels of refinement. These standards yield a semi-glossy finish by employing 600-grit, 400-grit, or 320-grit sandpaper, respectively. Achieving the desired surface quality involves using tools of varying sizes for filing, necessitating back-and-forth sanding across the mold surfaces. In contrast to the SPI A-level finishes, this sanding technique tends to leave more visible lines on the surface due to the back-and-forth motion.
The following discussion provides insight into these SPI B-level standards, their associated finishing techniques, and the measurements of surface roughness.
SPI Standard B-1:
Semi-Glossy – Fine
Finishing Method– 600 Grit Paper
Surface Roughness– 0.05 to 0.10 Ra (μm)
SPI Standard B-2:
Semi-Glossy – Medium
Finishing Method– 400 Grit Paper
Surface Roughness– 0.10 to 0.15 Ra (μm)
SPI Standard B-3:
Semi-Glossy – Coarse
Finishing Method– 320 Grit Paper
Surface Roughness– 0.28 to 0.32 Ra (μm)
Certain features of the mold, particularly those designed to accommodate thin, deep ribs or small bosses, pose a greater challenge for mold polishing, primarily because they are smaller than what a standard file can effectively reach. Typically, such features are situated on non-visible surfaces on the cavity side of the mold. Techniques exist to address this issue in mold construction, such as utilizing sub-inserts, allowing for access to these challenging features during the mold polishing process. To achieve optimal results, it is advisable to discuss such considerations during the Design for Manufacturing (DFM) phase of mold development.
Matte Finishes
SPI standards C-1, C-2, and C-3 represent coarser surface finishes, offering a faster and more cost-effective alternative. These finishes are particularly suitable for applications involving cosmetic or non-visual interior surfaces. Each C-level SPI finish is achieved using a sanding stone tool with a specific grit.
SPI Standard C-1:
Matte finish – Fine
Finishing Method– 600 Grit Stone
Surface Roughness– 0.35 to 0.40 Ra (μm)
SPI Standard C-2:
Matte finish – Medium
Finishing Method– 400 Grit Stone
Surface Roughness– 0.45 to 0.55 Ra (μm)
SPI Standard C-3:
Matte finish – Coarse
Finishing Method– 320 Grit Stone
Surface Roughness– 0.63 to 0.70 Ra (μm)
Textured Finishes
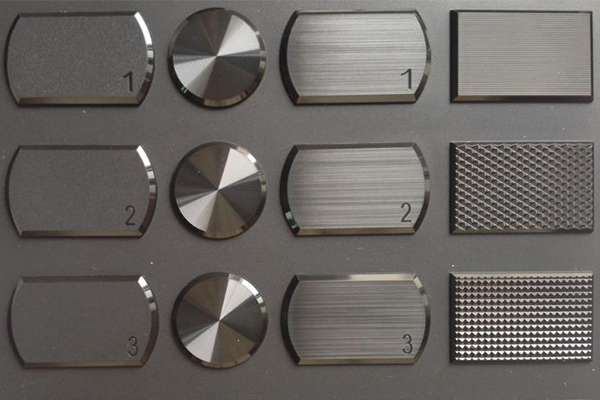
In injection molding, parts can exhibit a textured finish as opposed to a mold polishing one. There exists a wide array of texture options, categorized into three main systems:
- SPI and Mold Tech textures (United States)
- VDI textures (European)
- YS textures (Asian)
These options include variations in light, medium, and heavy textures, as well as the replication of wood or leather grain, checkerboards, or diamond patterns. To create mold textures, industry practices often involve methods such as bead blasting, chemical etching, and mirror EDM. Additionally, laser etching and standard sinker EDM are also employed.

Bead Blasting
Bead blasting is a technique used to introduce textured finishes by propelling various media onto mold surfaces through a high-pressure air stream. SPI finishes D-1, D-2, and D-3 all employ a dry blast method, utilizing different media. To expedite production and reduce costs related to outsourcing, prototype tool manufacturers frequently equip their facilities with in-house bead-blasting machines.
The following discussion elaborates on the SPI standards governing mold texture.
SPI Standard D-1:
Light Texture
Finishing Method– Dry Blast Glass Bead #11
Surface Roughness– 0.80 to 1.00 Ra (μm)
SPI Standard D-2:
Medium Texture
Finishing Method– Dry Blast #240 Oxide
Surface Roughness– 1.00 to 2.80 Ra (μm)
SPI Standard D-3:
Heavy Texture
Finishing Method– Dry Blast #24 Oxide
Surface Roughness– 3.20 to 18.0 Ra (μm)
Chemical Etching
The process of chemical etching involves the application of a specialized film onto the mold, which is then immersed in an acid bath. The acid selectively erodes the unprotected surfaces, ultimately producing the intended texture. These mold textures are relatively intricate, typically leading to outsourcing this work to specialized finishing facilities. Depending on the facility, this procedure can span from 2 to 5 days.
We recommend that discussions regarding chemical etching textures take place during your Design for Manufacturing (DFM) design review, especially if your design is in the engineering validation testing (EVT) stage, the design validation testing (DVT) stage, or if engineering changes may be anticipated. It’s often advantageous to apply texture to your tooling after initial sampling and when the design is stabilized to accommodate engineering changes (ECs).
Mirror EDM
Certain products necessitate precision in dimensional tolerances or design consistency that prohibits manual intervention on the tooling. For instance, in cases where seamless assembly is a critical design aspect, such as a smartwatch with mating parts, mirror electro-discharge machining (EDM) is recommended. This method involves the creation of a copper electrode that replicates the part’s surface shape and utilizes electrical sparks to erode the mold’s surface, achieving the desired texture.
When opting for mirror EDM, it’s advisable to use hardened steel due to its capacity to deliver a smoother surface finish. However, it’s important to note that mirror EDM is more time-intensive compared to CNC machining or manual mold polishing. Typically, the machines used for this process are of German, Japanese, or Swiss origin. Given its higher cost, we can assist you in determining whether mirror EDM texture is essential for your specific needs.
Guidelines for Texturing Plastic Parts
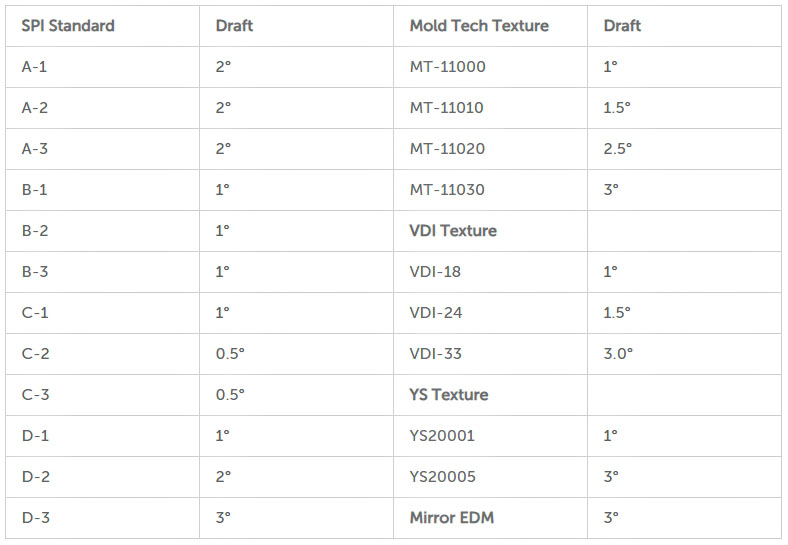
When aiming for textured surfaces on custom plastic parts, it’s essential to implement a more substantial draft to facilitate the easy release of the part from the mold, minimizing any drag marks. The surface finish chart provided below outlines the necessary draft angles for the most prevalent finishes.
Furthermore, we offer support for multiple surface finishes on the exterior facets of the part. To ensure clarity, kindly furnish a color-coded image along with annotations specifying the finish type and corresponding surface locations. Given that the tool will be masked, we recommend the incorporation of a stepped feature measuring 0.010 inches (0.25 mm) to separate these distinct surfaces effectively.
It’s crucial to recognize that selecting the most suitable surface finish for your injection-molded parts can be a complex decision. Our team of DFM experts is readily available to provide guidance throughout the process. To initiate this valuable assistance, simply create an account and take the first step.
For any further questions about mold polishing and mold texture, please feel free to contact us!

Get a free quote and design analysis today.
We’ll reply to you within 6 working hours.
We respect your privacy.
+86 139 2927 4777 (WhatsApp, Wechat)
